ColecoJam is a Colecovision emulator running on the Adafruit Fruit Jam. The ColecoVision was a second-generation home video game console released by Coleco Industries in 1982. It became one of the most successful competitors to the Atari 2600 and is remembered for bringing surprisingly arcade-like graphics and gameplay into the home at that time. The ColecoJam brings back that 1980s nostalgia in a modern format.
Hardware Setup
The ColecoJam is based on Adafruit’s Fruit Jam. In addition to the Fruit Jam, you will need the following items:
- MicroSD card (for storing game ROMs and the Colecovision BIOS file)
- 1 or 2 USB game controllers (https://www.adafruit.com/product/6285)
- USB C cable to connect the Fruit Jam to your computer
- HDMI cable and video monitor (monitor must support 640×480 resolution)
You will also need a copy of the Colecovision BIOS (not included) and at least one game cartridge ROM (also not included). Optionally, you can add the Colecovision Game Cartridge Reader, which allows you to insert a Colecovision game cartridge directly into the Fruit Jam and play the game directly from the inserted cartridge, just like the original Colecovision!
Micro SD Card Setup
Format the Micro SD card as FAT32 and create the following file structure:
/coleco/
COLECO.BIN <- the 8 KB ColecoVision BIOS (you must supply this)
Donkey Kong.ROM
Cosmic Avenger.ROM
...
All files will be stored under the “/coleco” folder. Only files ending in .ROM (case-insensitive) appear in the game browser. The BIOS is a copyrighted Coleco ROM image; it is not included here and you need to dump it from your own console or otherwise obtain it lawfully. The same goes for game ROMs. You can use the Colecovision Cartridge Reader for the Fruit Jam to create Game ROMs from your own cartridges or run game cartridges directly from the cartridge reader.
Install the ColecoJam Image
Download the latest colecojam.uf2 from the GitHub repository at: https://github.com/cogliano/Adafruit_ColecoJam/releases/latest
To install the uf2 file, press and hold button 1,then press the “Reset” button and release. You should see a mounted drive appear on your computer. Copy the uf2 file into this folder, and the Fruit Jam should reboot now with the ColecoJam image.
Controller Buttons
In addition to the joystick and side action buttons, the Colecovision controllers included a numeric keypad, complete with “*” and “#” keys. The USB controllers do not contain a numeric keypad, but the number have been mapped using one or more button presses. For example, many games use “1” to select one player mode. This button is mapped to the “A” button on the controller.
USB gamepads plug into the two USB-A ports. Player 1 is the first pad enumerated, player 2 the second. Mapping follows the Adafruit SNES-layout controller:
| Gamepad | ColecoVision |
|---|---|
| D-pad | Joystick |
| Left shoulder | Left side action button |
| Right shoulder | Right side action button |
| Select | Keypad * |
| Start | Keypad # |
| A / B / X / Y | Keypad 1 / 2 / 3 / 4 |
| Select + A / B / X / Y | Keypad 5 / 6 / 7 / 8 |
| Start + A / B | Keypad 9 / 0 |
Combinations take priority: holding Select and pressing A sends 5, not * then 1. Select or Start on its own is what produces * or #.
Playing a Game
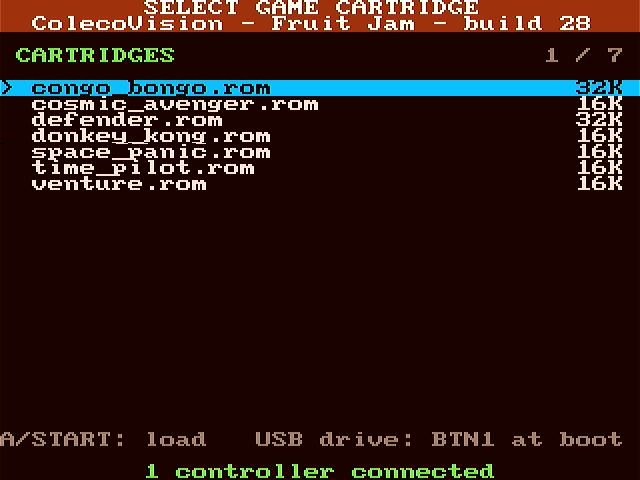
Once you have your SD card with the appropriate files inserted into the Fruit Jam and all your cables loaded, you should see a game cartridge selection screen. Select the game you want to play by moving the joy stick up or down and selecting the game with the “A” button. The game should load and you can now play your Colecovision game!
Bonus feature: Pressing and holding button 1 down after turning on the Fruit Jam the SD card will be visible to your computer. You can now copy and delete games from your SD card without having to remove it from the Fruit Jam. Use the eject option for the SD card drive when done or restart the Fruit Jam to continue to the cartridge select screen.