Completed WiFi and voice TV remote
This past holiday season my wife asked me if I could make her a homemade gift for Christmas. So, I gave a her a gift that required some soldering, programming and configuring a web based service. I’m not sure if that was what she was expecting for a homemade present but I like the result, which is a WiFi and voice TV remote using an ESP8266.
Now we have a frequent habit of losing the TV remote in our house. It will eventually show up but not before a search for it between the cushions and under the sofa and chairs. That is one reason why I have an Android phone with an IR blaster in it, which allows me to control the TV when the remote is missing. However, my wife has an iPhone which does not have that feature. So I decided to build this remote for her so she can use it when the remote is not nearby or has gone AWOL. She can also use voice commands to control the TV if she does not have her phone nearby.
The web remote is accessed via a web page on a smart phone. The voice remote is accessed using either Google Home or Amazon’s Alexa, which allows you to control the TV with voice commands. Smart phones with Google Assistant or Alexa enabled should also be able to listen to commands. This article explains how I created the WiFi and voice TV remote.
The project has four parts:
- Build an IR receiver to capture codes from the remote
- Build an IR transmitter to send codes to the TV
- Install and customize the code
- Integrate the WiFi remote with Google Home or Alexa
The Hardware
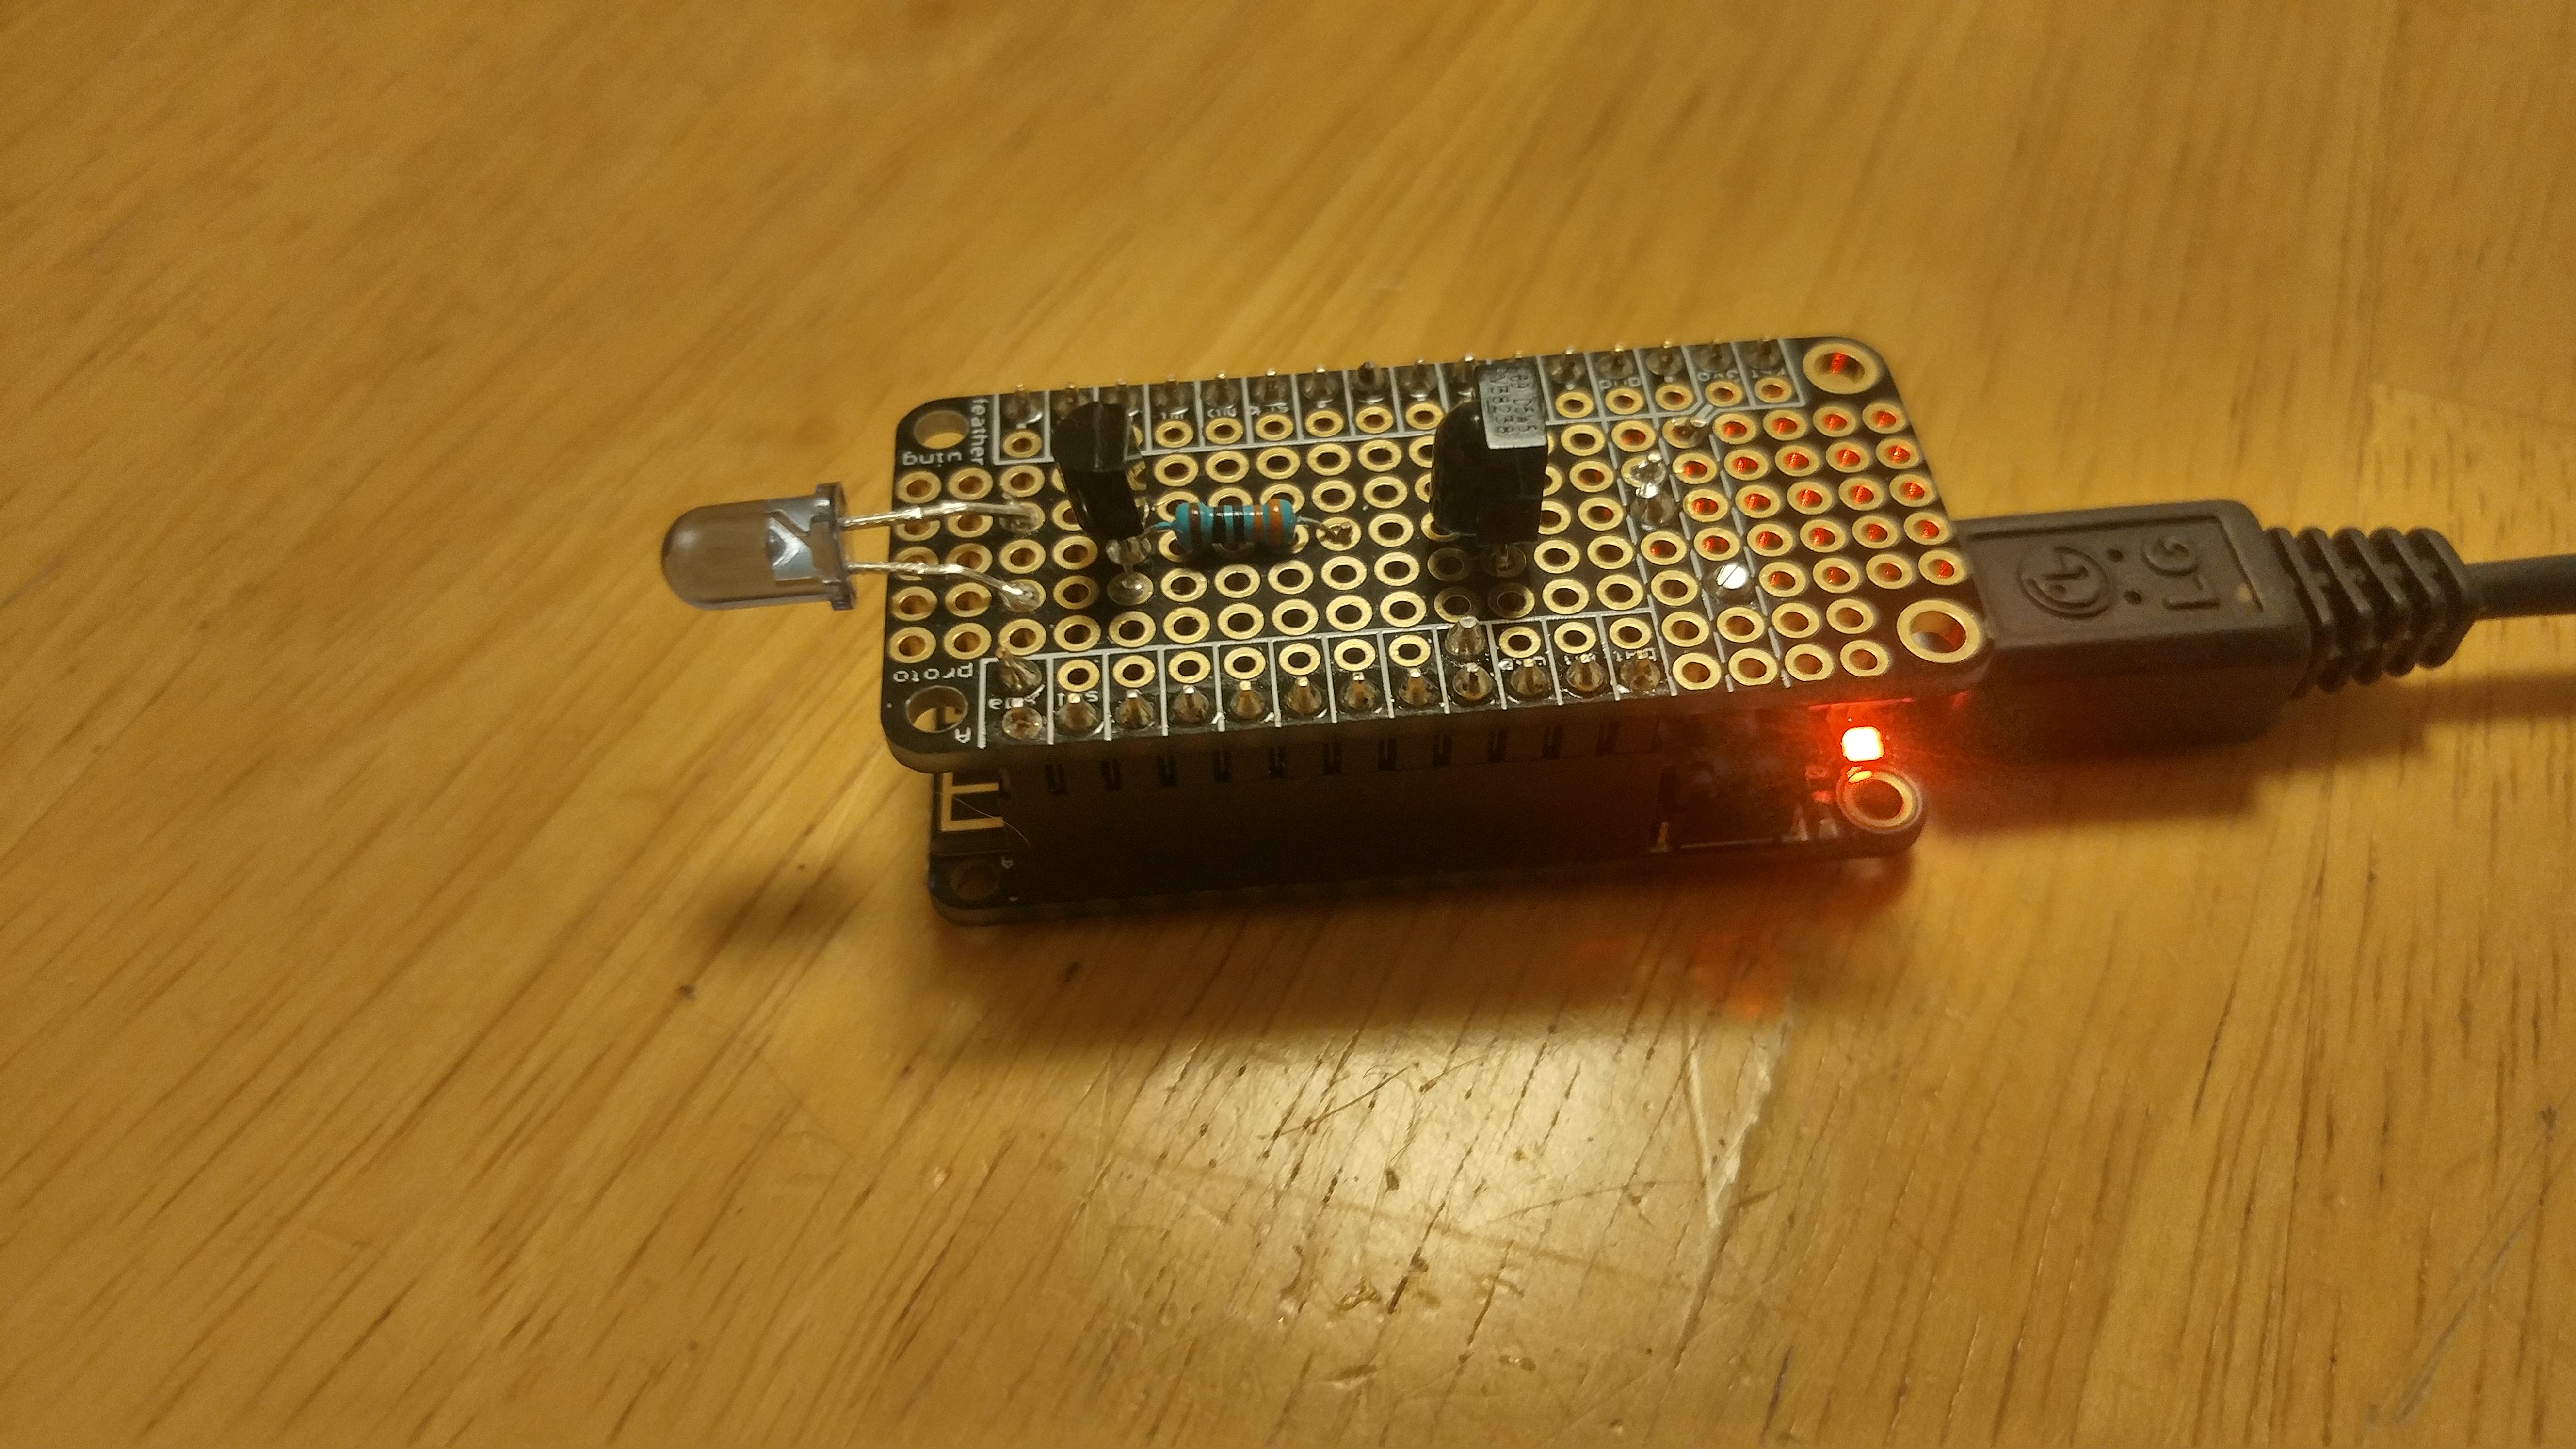
An Adafruit Feather HUZZAH board using the ESP8266 WiFi chip was used. This is an inexpensive but versatile chip and provides the WiFi access and a simple web server needed for this project. An Adafruit Feather prototype board was also used to hold the IR receiver and transmitter circuits. Both IR receiver and transmitter circuits fit nicely on one prototype board.
Here are the parts that were used:
- Assembled Feather HUZZAH w/ ESP8266 WiFi With Stacking Headers (https://www.adafruit.com/product/3213) – This feather can be purchased with or without headers. I decided to get stacking headers pre-soldered on the board. This allowed me to test the circuits using a breadboard and then cut the legs off when the circuit was soldered onto the feather prototype board
- FeatherWing Proto – Prototyping Add-on For All Feather Boards (https://www.adafruit.com/product/2884)
- IR (Infrared) Receiver Sensor – TSOP38238 (https://www.adafruit.com/product/157)
- Super-bright 5mm IR LED – 940nm (https://www.adafruit.com/product/387)
- NPN Bipolar Transistor (PN2222) (https://www.adafruit.com/product/756)
- 300 – 470 Ohm Resistor
This article provided help in building the two circuits:
https://learn.adafruit.com/using-an-infrared-library
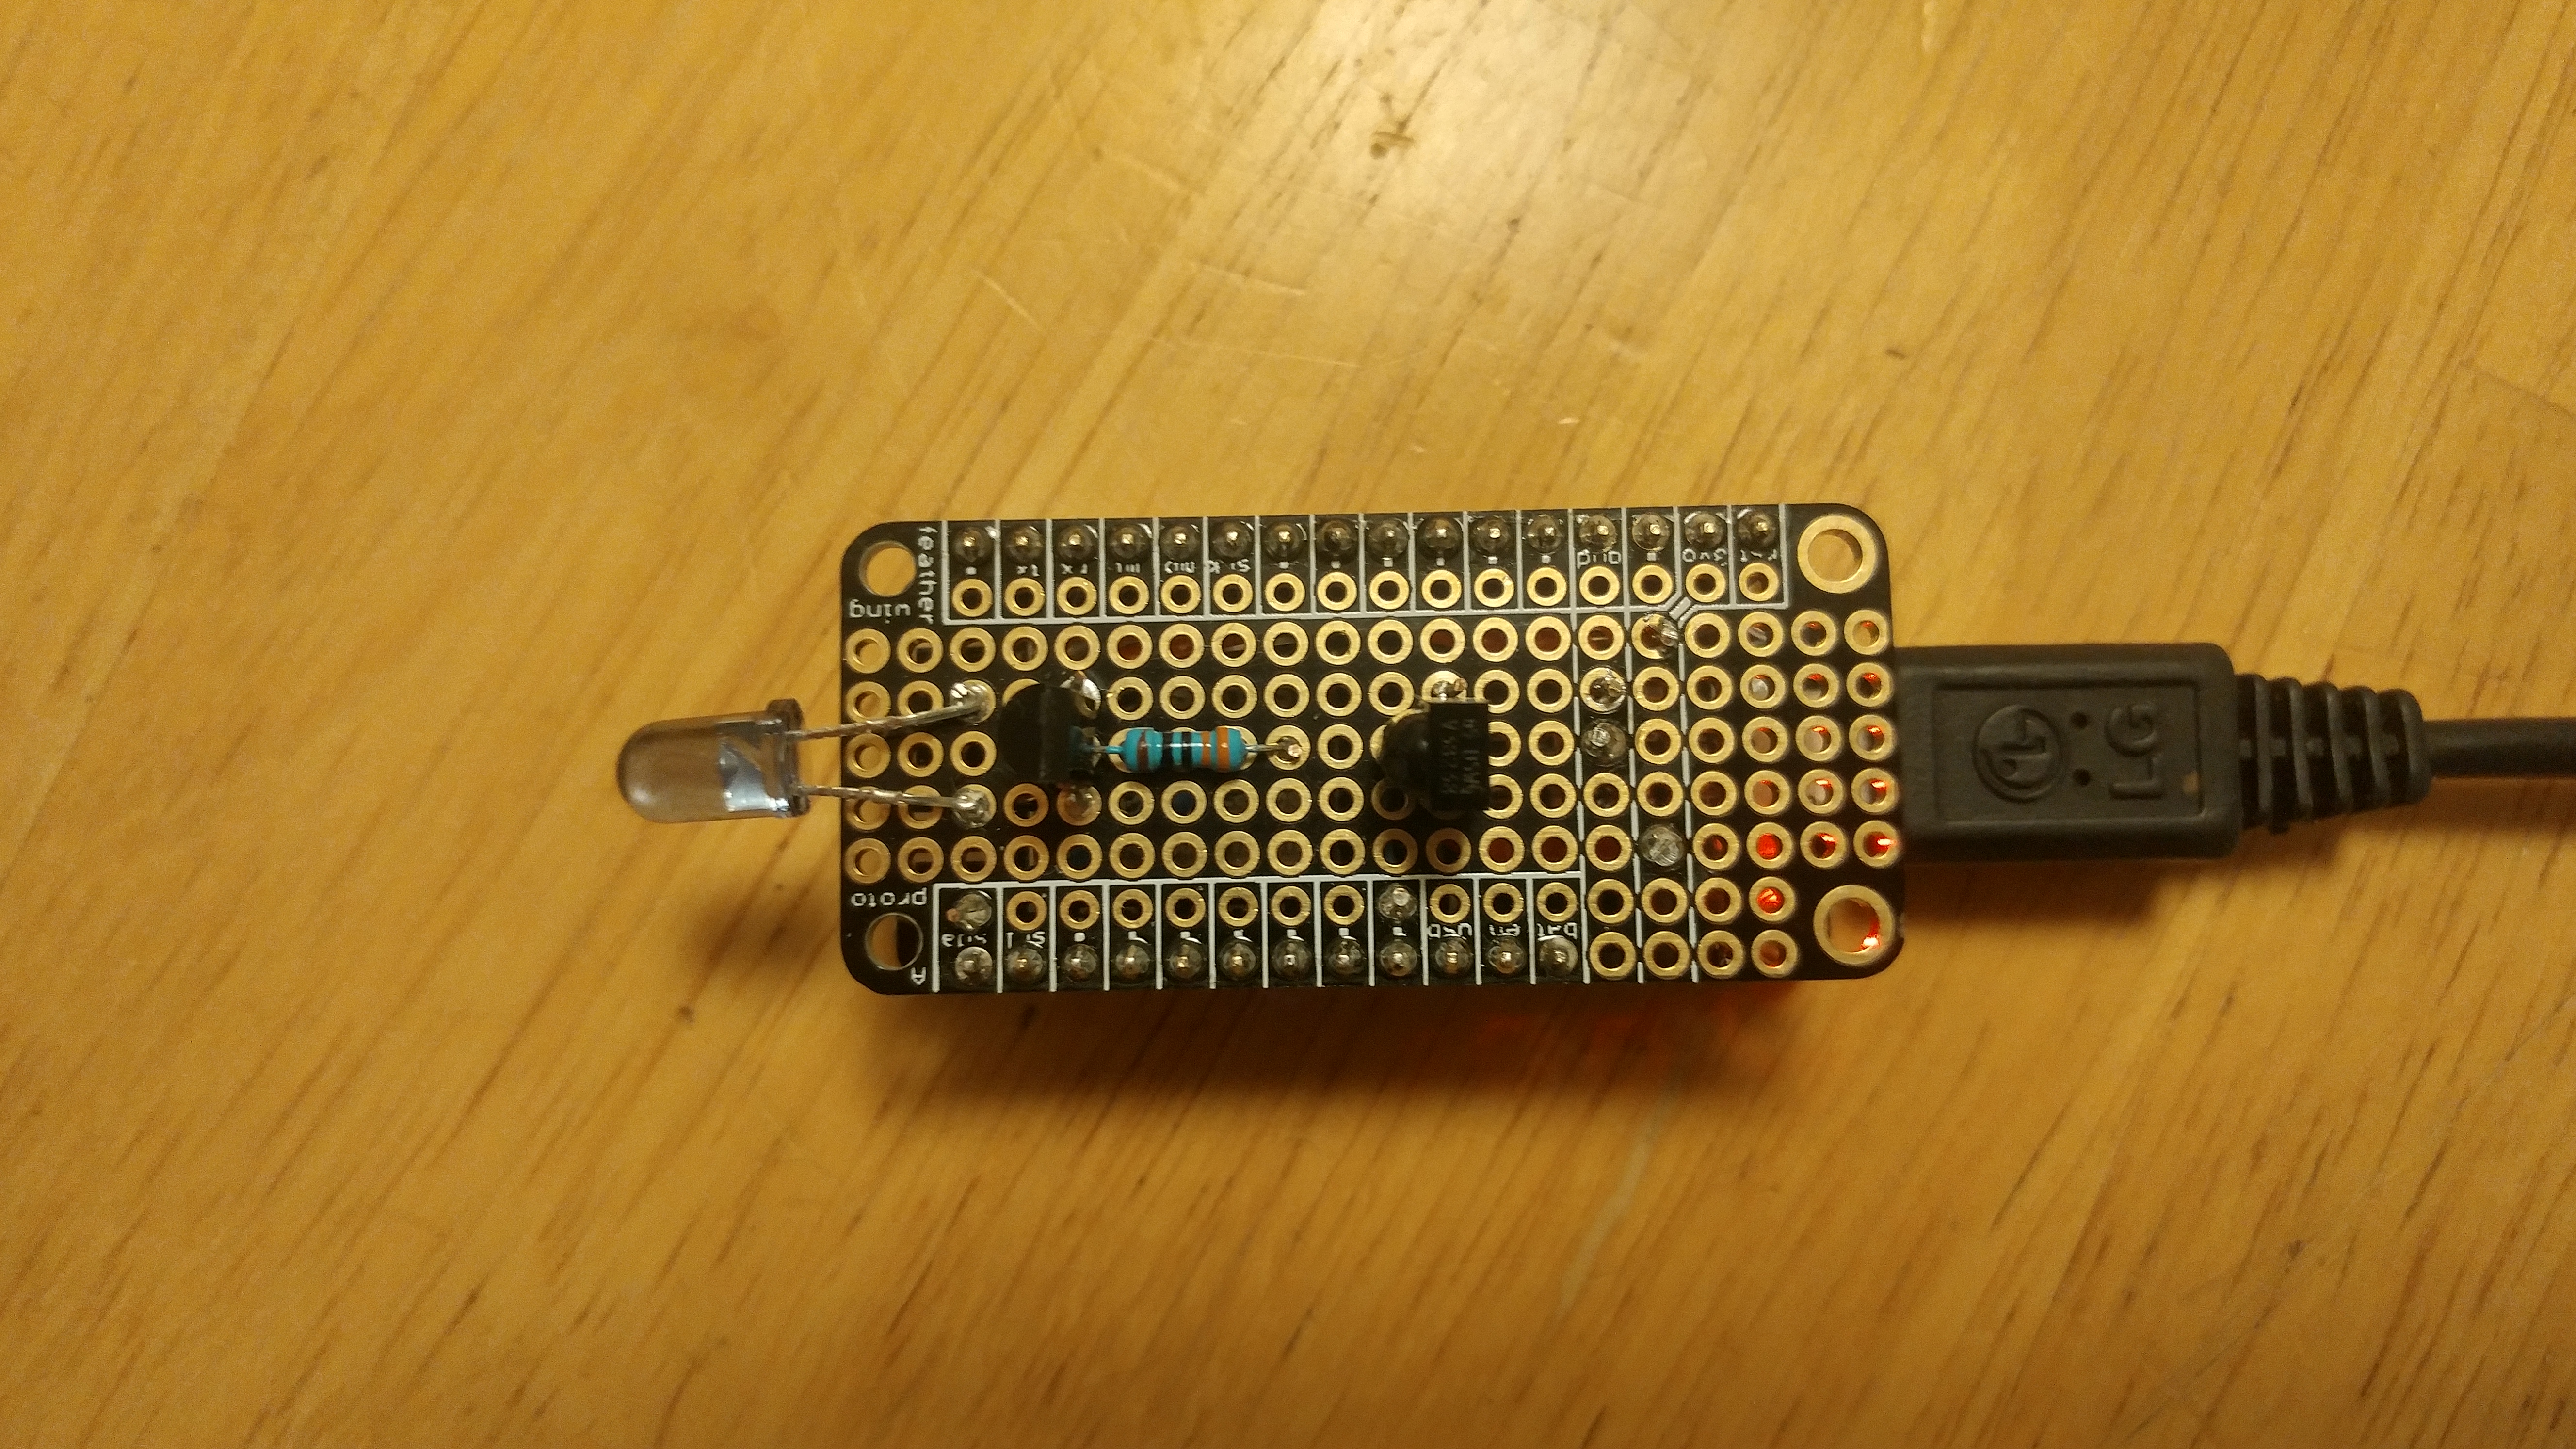
Circuits transferred to prototype board
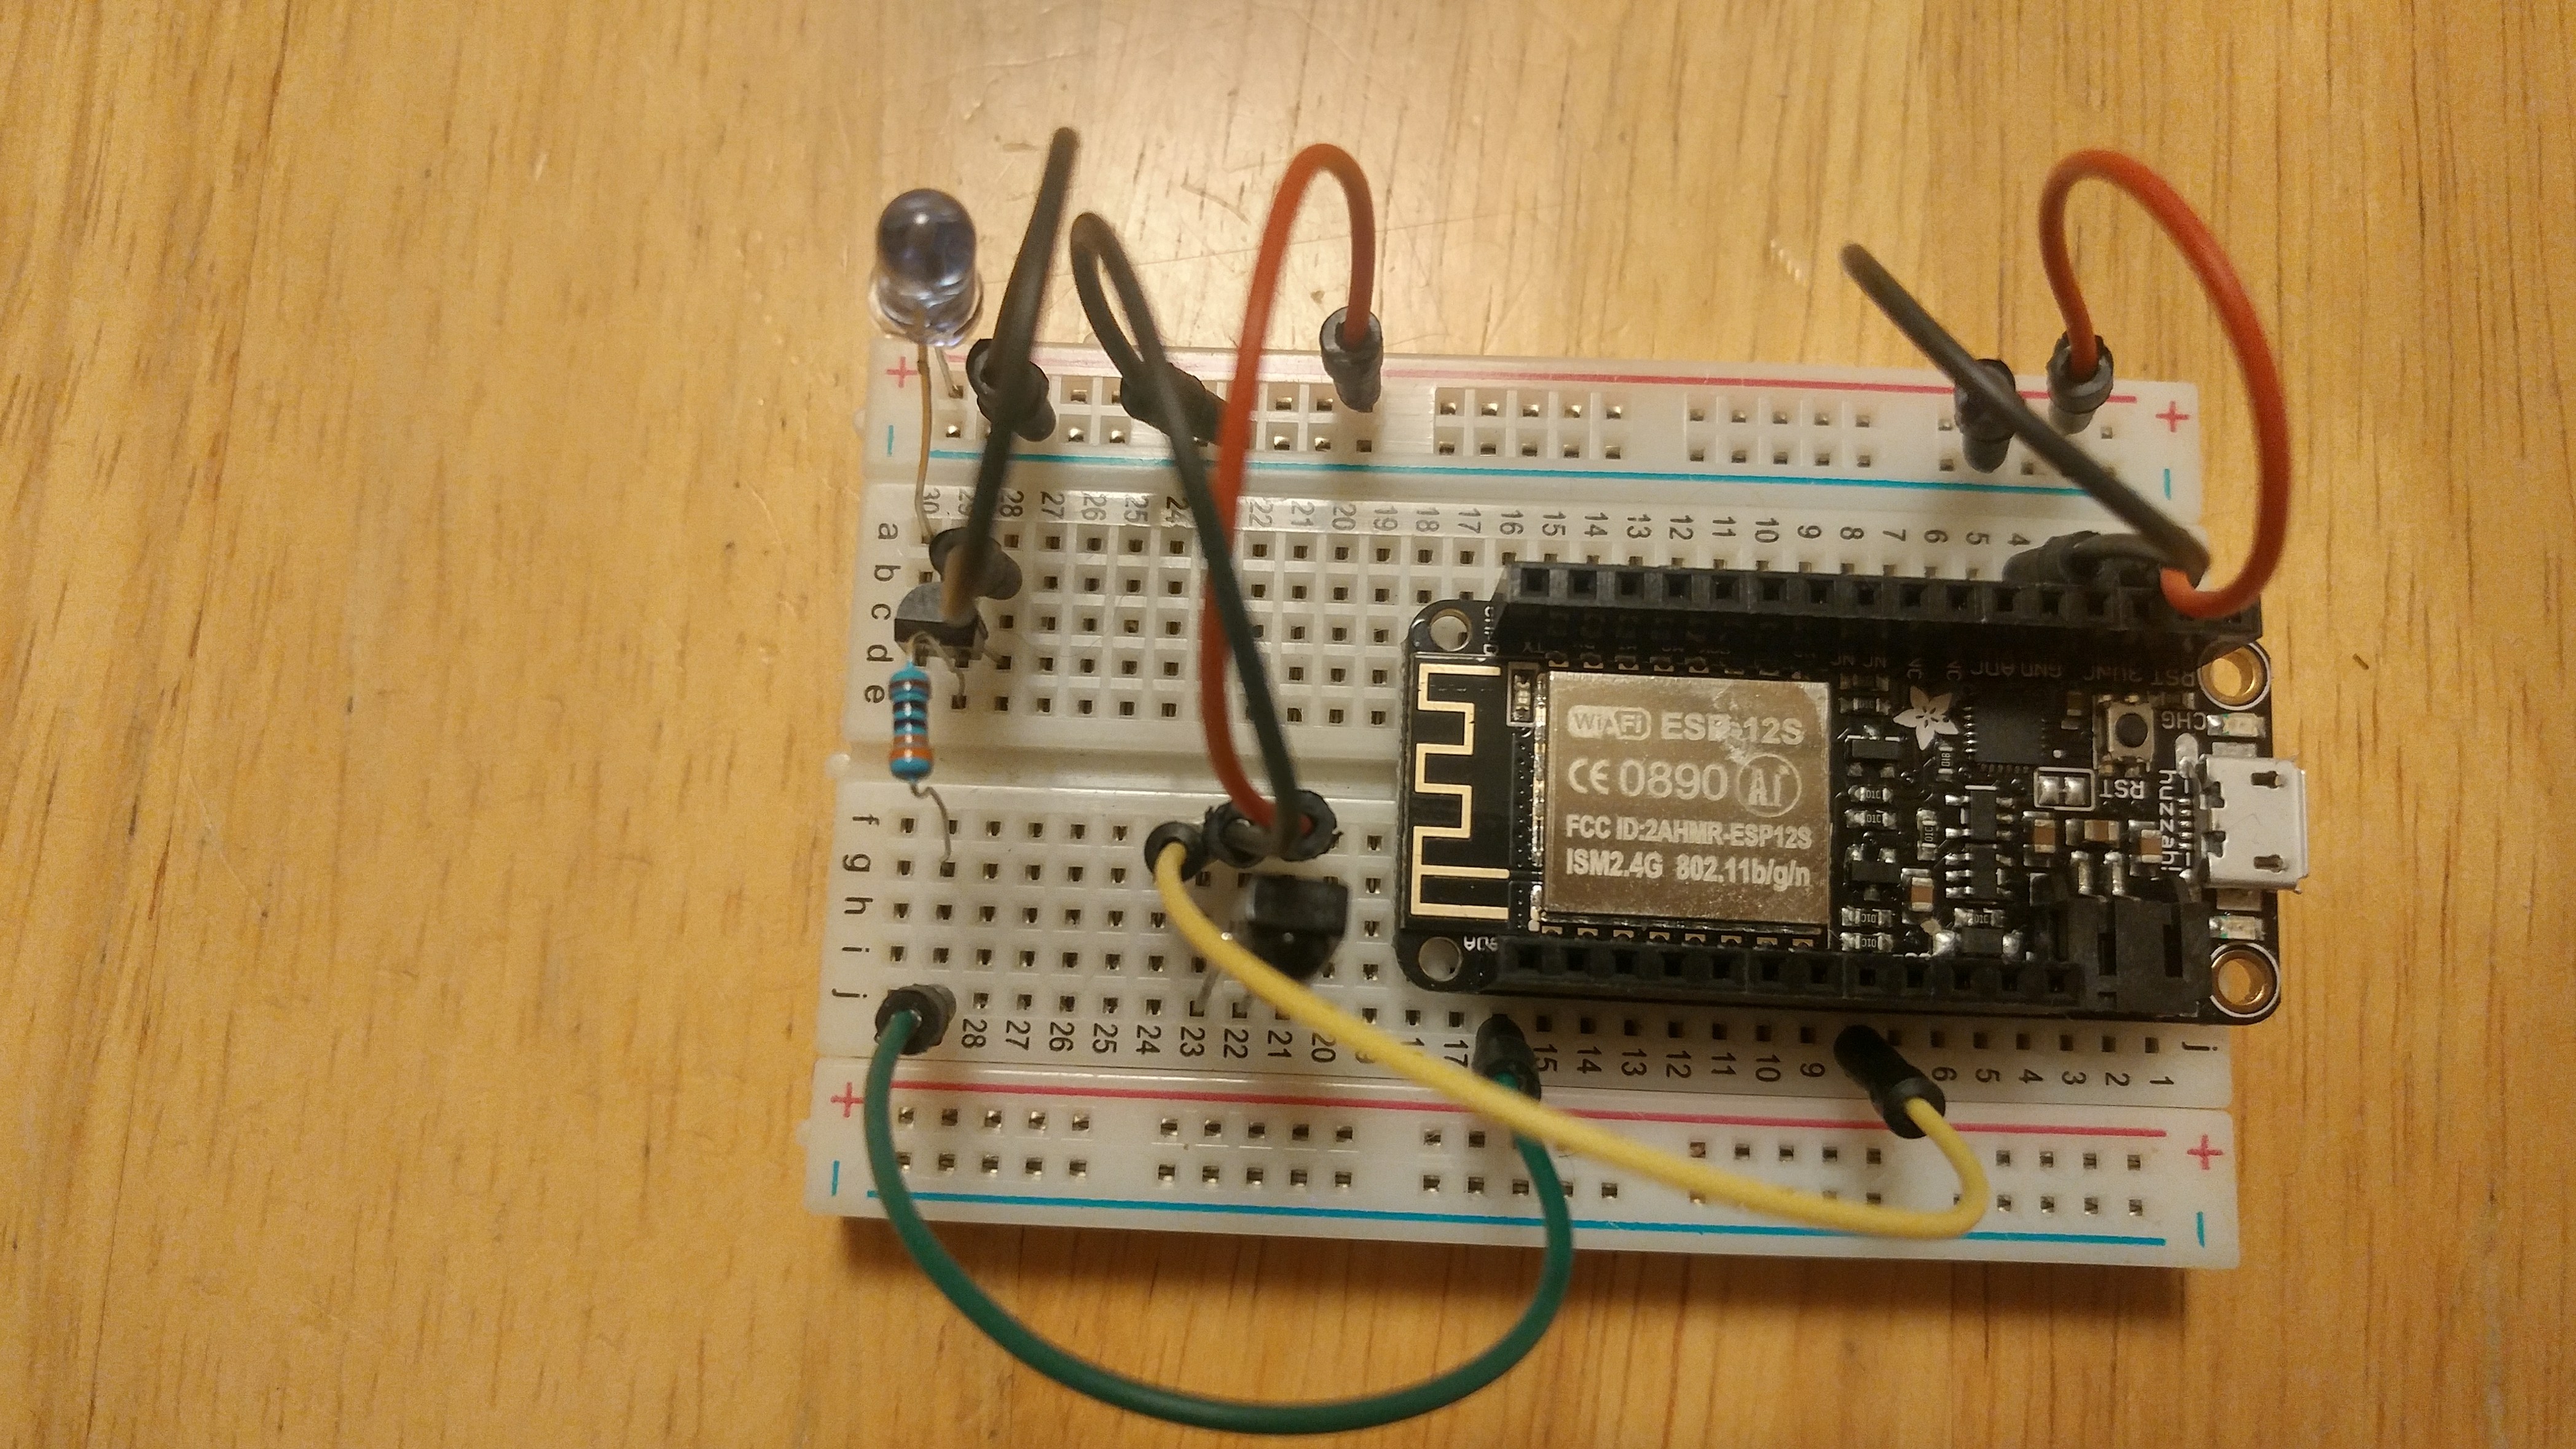
Breadboard circuits
For the IR receiver circuit in this project, GPIO pin 14 was used for the circuit, the same as shown in the article. The usable GPIO pins are limited for the ESP8266, but I did find GPIO pin 4 usable, so that was used for the IR transmitter circuit (the article above used GPIO pin 3, which is not available on the Feather ESP8266). The article called for a 470 Ohm resistor for use with the IR LED. I did not have that laying around but I did have a 300 Ohm resistor. That seams to be working just fine. The IR LED may be a bit stronger too. The circuits were created on a breadboard and tested prior to committing them to the prototype feather board. Testing is done with the sketches described below.
The Software
Before installing the web remote sketch, you will need to install the Adafruit HUZZAH ESP8266 board in the Arduino IDE if it is not already installed. Also, the IRremoteESP8266 library will need to be installed into your libraries folder, which can be found on GitHub here:
https://github.com/markszabo/IRremoteESP8266
Install the ESP8266 TV remote sketch here:
https://github.com/ZContent/ESP8266WiFiRemote
An Arduino sketch was used to capture the IR codes needed for the web remote. Fortunately, this sketch is already available in the example files for the IRremoteESP8266 and can be compiled as is (same GPIO pin is used). Compile and run the example sketch IRrecDumpV2. Open the serial monitor, you will see the raw data of the IR codes when pointing the remote at the IR receiver. Copy the rawdata from the serial monitor window to the appropriate line in the ircodes.h file in the web remote sketch. If you use both a TV and cable box, you will need both remotes to capture all the needed buttons.
The web remote sketch displays the WiFi remote web page and sends IR signals to the TV. Unlike the previous sketch, this one will need customization. You will need to enter your WiFi account and password in the sketch in order for your device to connect to your home router. IR codes will need to be found for your TV and cable box combination and entered into the sketch using the previous sketch. You may also want to add and/or modify the buttons on the remote. My wife likes the Hallmark channel, so I added 2 buttons to switch directly to those channels (kind of like Roku’s dedicated channel buttons, but without the paid compensation :-/ ).

WiFi TV remote web page
Using the Remote
Find a location where you can power the device and have a clear line of site to the TV and cable box. Point the LED at the TV. I bent the LED wires to point forward towards the TV. I placed the web remote about 5 feet away from the TV. After plugging power into the device, the red LED will flash while it is attempting to connect to the WiFi. Once the WiFi is connected, the LED will stay on, signalling the device is ready for use. The serial monitor window will show the IP address the device is using. Open a browser window on your phone or computer to the IP address of your device. Make sure you prefix it with “http://” so you will go directly to the remote page and not to a search results page. Once you have the page displayed, you can bookmark and make it an icon on your phone so the remote is only one click away. When clicking the buttons, you will see the red LED flashing, signalling it is sending commands to the TV. You will have to remember that you no longer need to point the remote at the TV. You can actually be in another room and it will still work as long as you are in your home WiFi network.
“Viewscreen On”
The web remote works great as is. However, with a little bit of additional effort, the wifi remote can be integrated with either Google Home or Amazon’s Alexa to make it a voice controlled remote. You can say things like “Hey Google, turn on the TV.”, “mute the TV” and “show me the Hallmark channel”. Trekkies could even say, “Hey Google, viewscreen on”.
Integrating the voice remote requires 2 steps:
- Configuring your home router to allow the web remote to be used on the internet
- Configuring your voice commands
You will need to determine your web remote’s public IP address as seen from the internet, which is different than the IP address on your home network. One way to do this is to go to google.com from a device on the same home network and ask the question, “what is my ip address?”. Google will display your public IP address. Using port forwarding on your home router, you can control the web remote from outside your home over the internet, which is what Google Home needs in order to send commands to the remote. This might seem scary, allowing your TV to be controlled outside of your home. What I did was require a particular port to be used in the URL in order to access the web remote. Usable port numbers generally range from 1024 to 65535. This allows your port number to act like a password, allowing access to only those who know the port number. This is not the best security and could be defeated using brute force methods, but it was adequate for my needs.
The web remote uses port 80 on the home network, but with port forwarding, you can forward outside traffic from a designated port to port 80 internally. For example, if your public IP address is “1.2.3.4”, and your configured port is “5555”, the URL for the web remote will be “http://1.2.3.4:5555”, and the home router will reroute the traffice to the internal IP address at port 80. Try your URL and see if you can reach the web page of the web remote. This needs to work before moving on to configuring the voice commands.
The second item is configuring the voice commands. This was perhaps the easiest (and probably the most fun) of the all the tasks of the project, thanks to the “If This Then Site” website ifttt.com, where you create applets for each voice command. The voice command will submit a carefully crafted URL to the remote. The IFTTT site supports both Google Home and Amazon’s Alexa. Google Home has an edge here over Amazon’s Alexa, as Google can recognize spoken numbers and act upon them. For example, when saying “Hey Google, switch to channel 123”, Google will recognize the number as a parameter to send to the remote. This is currently not possible using Alexa with IFTTT, which currently supports only simple voice commands. Alexa voice commands also need to be prefixed with the word, “trigger”, so to turn on the TV you will need to say something like “Alexa, trigger viewscreen on”. The Google version also seems more polished, with the ability to enter up to three phrases to execute the action and the ability to enter the response text after the action is completed, like, “OK switching TV input to Roku”. In contrast, Alexa says “sending that to ifttt” pronouncing “ifttt” as if it were a word instead of an acronymn.
Once you have configured the “If This” part of the service with either the Google Home or Alexa service, you will then need to configure the “Then That” part of the service using the Webhooks service. This will submit a URL to your remote after the voice command is recognized.
The following chart shows the commands that are available and the URLs needed to accomplish them.
| Command | URL | IFTTT Google Assistant Trigger | IFTTT Alexa Trigger | Example Voice Commands | Notes |
|---|---|---|---|---|---|
| Power TV & cable box on/off | /button?task=power | “Say a Simple Phrase” | “Say a specific phrase” | “turn on the TV”, “turn off the TV”, “view screen on” | The power command is a toggle, so the same command can be used to turn on or off the TV. Use task name of “tvpower” or “cablepower” to toggle the power only for either the TV or cable box, respectively. |
| Mute/unmute the TV | /button?task=mute | “Say a Simple Phrase” | “Say a specific phrase” | “mute the TV”, “unmute the TV” | The mute command is a toggle, so the same command can be used to mute and unmute the TV. |
| Turn up the TV volume | /button?task=volup&value=5 | “Say a Simple Phrase” | “Say a specific phrase” | “turn the TV volume up” | Adjust the value to change the number of volume button clicks per command. |
| Turn down the TV volume | /button?task=voldn&value=5 | “Say a Simple Phrase” | “Say a specific phrase” | “turn the TV volume down” | Adjust the value to change the number of volume button clicks per command. |
| Switch to a channel by number | /button?task=channel&value={{NumberField}} | “Say a phrase with a number” | N/A | “show me channel #”, “switch to channel #” | Can be used with any channel number. |
| Switch to a channel by name, show current channel | /button?task=channel&value=123 | “Say a Simple Phrase” | “Say a specific phrase” | “show me the Hallmark channel”, “switch to the Hallmark channel”, “what TV channel is this?” | Replace “123” with the actual channel number. This command works for a single channel. Use an empty value to display current channel for TVs that display the channel when the OK button is pressed with no channel selected. |
| Change TV input mode by number | /button?task=input&value={{NumberField}} | “Say a phrase with a number” | N/A | “switch input”, “switch input 4” | |
| Change TV input mode by name | /button?task=input&value=x | “Say a Simple Phrase” | “Say a specific phrase” | “switch input to ROKU”, “switch input to TV” | Replace “x” with the actual # of times to press the input button. The value will be specific to the number of devices attached and powered to your TV. If there are more than 2 input devices, then using change TV input mode by number may be more appropriate. |
| Move up a specified # of channels | /button?task=chanup&value=x | “Say a phrase with a number” | N/A | “up 5 channels” | |
| Move down a specified # of channels | /button?task=chandn&value=x | “Say a phrase with a number” | N/A | “down 1 channel” | |
| Switch to a random TV channel (range) | /button?task=random&value=lowrange-highrange | “Say a Simple Phrase” | “Say a specific phrase” | “pick a news channel”, “find a TV music channel”, “play some TV music”,”show me sports” | a random channel is picked from within the range lowrange to highrange, inclusive. |
| Switch to a random TV channel (list) | /button?task=random&value=channel1,channel2,…channeln | “Say a Simple Phrase” | “Say a specific phrase” | “pick a news channel”, “find a TV music channel”, “play some TV music”, “show me sports” | a random channel is picked from the list of channels. |
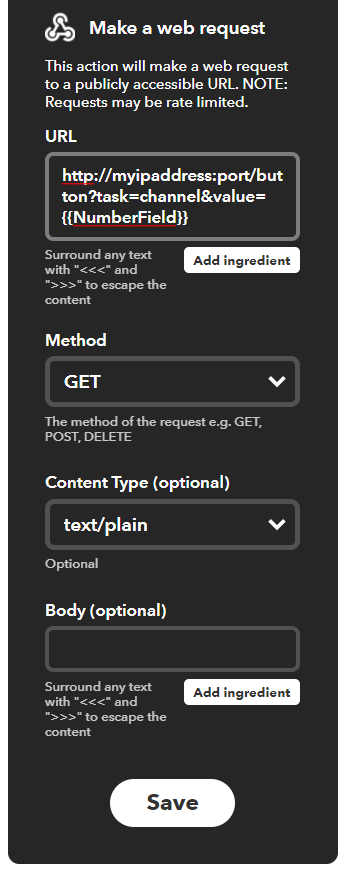
Here is an example IFTTT applet to switch to a specified channel using Google Home. The first part of the applet defines the Google Home parameters. You can have up to three voice phrases recognized. If you need more, then create a new applet giving you three additional voice phrases.
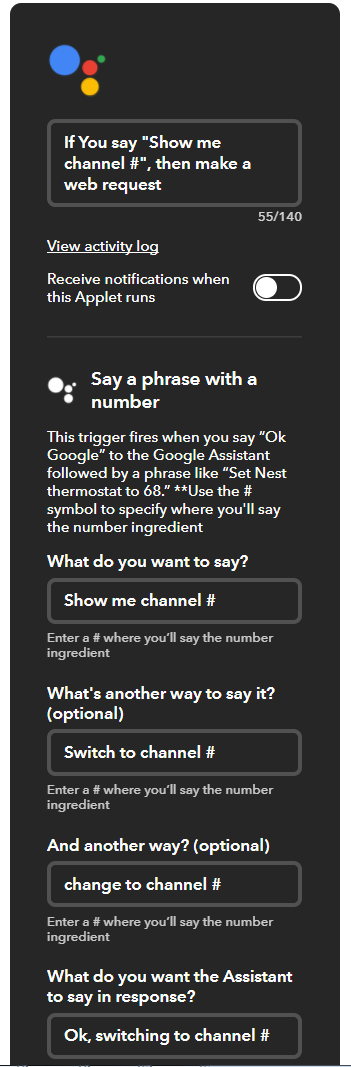 The second part of the applet defines the URL needed to send to the ESP8266. Use your IP address and the forwarded port number configured in your home router. Note the {{NumberField}} is added by the “Add ingredient” button and is the translated channel number from the first part of the applet.
Caveats
There are some reserved phrases that you can not used with Google Home and Alexa. In Google Home, for example, “turn the volume up” can not be used with the voice remote because that is reserved for turning up the volume on the Google Home device, however, changing the phrase to “turn the TV volume up” works. I also had some issues with using the number 2 when saying “up 2 channels”. I believe Google is translating it to the word “to” instead of the number “2”. Other numbers seemed to work fine.
Conclusion
I have over a dozen voice commands set up so far with IFTTT and may set up a few more for some dedicated channel voice commands. I’m not sure who likes this present more, myself or my wife, who I think is still partial to a physical remote. But in my opinion, it is better to give than to receive, right?
Update: This article has been updated to reflect updated code to now allow voice controlled random channel selection from a list in addition to a range of channels. Also, you can ask what channel you are watching by using the /button?task=channel URL with no channel value. This is basically pressing the OK button on the remote with no channel entered, which many TVs will show the current channel on screen.